


Everything I planned is done, it's time to summarize the topic!
At the end of September, I came to the end of a roughly one-and-a-half-year-old story, I finished my workstation used for laser cutting and engraving at home.
If you are curious about the truth, then I have to admit that it was not my idea to purchase a laser engraver that can be used at home. My partner was the one who likes to be creative (let's say me too, I just don't have time for it), and he was the one who brought up the idea to try it with a mid-range machine.

Well, getting to know each other took a lot of time, it took days, weeks, and months before it crystallized as a complete beginner as to exactly what we would need, what hardware, what accessories we would have to buy.
Just to give you an example, I started with a 2,5 watt output laser. I later changed this to 5,5 watts, and today I already have two 10-watt lasers at work.

In the past period, I also wrote a few articles on the subject, presented the machines I use, and also tested the newer laser units. I made not only text articles, but also videos, which you will find in the following articles:
In this article, I would like to present the last three tools I bought for working at home, as well as the work table, or rather a cabinet, which I think is essential if someone is a little more serious about cutting and engraving at home.

Why is it necessary to build an engraving station? Well, the answer is simple, because of the removal of combustion products. Laser cutting is not cutting in the sense that e.g. cut the bread with the knife. The laser burns the material.
It is true that this burning takes place in a very small area, so there is no need to worry about millimeter cutting losses, as with a saw blade or disk, because the focus of a well-adjusted laser is tenths or hundredths of a millimeter. Let's say it's the loss of a tenth of a millimeter that we can think about when cutting.

However, the fact is that no matter how thin the cut, we still burn material that will have some smoke. This is not pleasant even if you are working with completely natural materials, leather, wood, cardboard, but it will be really disturbing if you are cutting materials with glue, such as plywood.
Combustion products are released not only during cutting, but also during engraving, although usually less.

With a smaller amount of work, the air cleaner turned on and placed next to the machine was enough for me, especially for engraving, but this will be insufficient in the long run, with more work. So you have to take care of the exhaust.
For this, I used an old kitchen counter as a basis (it was free), I bought boarded spruce (Praktiker, reasonable price) and sanded down some of the remaining furred roof battens (this was also free). This finished the top of the table, which also became the bottom of the cupboard.

For laser cutting, some kind of metal plate on the table is definitely recommended, I didn't spend a lot of money on that either. I went to a roofing company and cut a 50 x 90 cm galvanized steel sheet, which I then glued to the table top.
Again, I assembled the frame of the cabinet from roof battens piece by piece. I covered the whole thing with a 4-millimeter HDF sheet, which is used, for example, for the back of cabinets. It's not too expensive, it's easy to cut, and it doesn't look pretentious either. If you want, you can even buy a lacquered one with a wood pattern.

I made the front panels out of Plexiglas so that I could see the machines at work. I bought a simple door hinge for the plexiglass sheets, a size suitable for cabinets, I can "hang" the plexiglass on these. It's easy to take off when I want to set up the machine and materials, and easy to put on when the job starts.

Finally, I included lighting. Exceptionally, I did not order this from China. In DIY stores, there is usually a marked-down section, where the presented, already unpacked and assembled stuff is placed. I bought a ceiling lamp here at half price, for HUF 4000. With that, the station was almost ready, I just had to solve the exhaust. In connection with this, I present one of the pieces of hardware that I have not written about yet.
The DeWallie extractor is specially designed for home use. I can support this with three important features. It looks normal (not something industrial), it's very quiet and we get a wireless switch.

The machine has a suction power of 300 Pa, which means that in practice, if I don't open the Plexiglas door of the cabinet, no smoke comes out, or only very little. The maximum air delivery is 530 cubic meters per hour.
This is important data, but not only because it shows how efficient the structure is, but also because you have to think about the fact that, if you use it in the apartment, it will absorb this amount of air from the air space of the apartment. If the windows close well and you use, say, a gas boiler, a fireplace or an iron stove, you can suck their combustion products back from the chimney.

I note that this danger also exists in the case of a simple kitchen hood, but many people do not think about it when they install a fireplace or iron stove in the living room with an American kitchen.
The structure is very easy to use. We get a power cable with an EU plug, it is also connected, so you just have to plug it into an outlet.
The pipe thickness that can be used is 6 inches, or 15 centimeters in domestic terms. This is a standard size, you can find such a pipe and clamp in a store that sells accessories for kitchen hoods. For the time being, I used a plastic flexible tube, but I plan to replace it with a fireproof piece later.

The extractor itself is not a complicated piece. The motor and the large fan are also located in the central, removable part. By removing the two red plastic clamps, we can highlight what is needed in order to be able to screw the base on, and also so that if we screw it to a wall or ceiling, the cable should preferably come out of the machine in the right place.
The interesting thing about this thing is that they add a really cheeky wireless switch. It is operated by a button cell and must be placed in a place where the extractor can be seen. Although it is written that the range is more than 20 meters, don't expect too much, the range is much smaller than that, it is still guaranteed flawless from 3-4 meters.

For me, wireless is of no use, but if you screw the motor to the wall (high) or to the ceiling, it will come in handy that you don't have to wire the switch separately.
With the switch, you can switch the extraction in two stages, the weaker one was more than enough for me so far, I never had to use the hell stage.


I am now the happy owner of two laser cutters/engravers. You can also find my articles about them at the beginning of this article.
First, I bought an Ortur Laser Master 2 Pro machine with a 2,5 watt output laser. This laser power is sufficient for engraving, but not so much for cutting. You can cut very thin plywood and cardboard, but you can only cut other things with a large macer and with sandblasted workpieces.
So, if you want to engrave in softer materials, 2,5 watts will be enough, but you have to think harder anyway.

A 5,5 watt laser is not bad anymore. You can already cut 3-4 millimeter plywood with it, if you use a honeycomb pattern pad and the Air Assist system, you will be able to make very nice cuts without burning the material.
Air Assist is an air injection that blows air on the workpiece, on the part that the laser is currently cutting or engraving. One of the advantages is that the edges of the cut do not burn, and the other is that much less smoke is produced during cutting due to the cooling. If you want to cut, it's definitely worth getting the honeycomb pattern holder and the Air Assist!

The end of the matter was that I bought a new 2-watt head for the Ortur Laser Master 10 Pro. The installation and use of this makes the use of the machine a little more difficult, because a separate controller must also be installed, which copes with the higher power consumption. The truth is, the increased performance is well worth the slight inconvenience.
The Laser Mater 2 Pro is not the factory one anymore, not only because of the laser unit, but also because I bought a package for it, with which I could increase its size. Here comes the presentation of my second new hardware!
Usable size laser engravers can get by with ~40 x 40 cm workpieces. This is not small, but sometimes we want to work with a larger workpiece. The Extension kit is for this. The package includes two aluminum rails, longer cables and ribbed belts, with this package we can increase the size of the workable material to 40 x 80 cm.

That's why I bought a larger, 50 x 90 centimeter steel plate for the machine!
Anyway, with a little skill, it can be solved for free so that the size of the workpiece is larger than 40 x 40 cm. To do this, the machine must be raised, and thus the workpiece can be slid sideways under the machine. It is true that we can only work with 40 x 40 cm in one step, but by sliding the material, the width can theoretically be unlimited.
With the help of the Extension kit, I can engrave and cut 40 x 80 centimeter boards without moving the material.

Installation of the Extension kit is simple, as all we have to do is replace the shorter pieces with longer ones, be it the rail or the cables. It took me about 15 minutes to install. After that, all you have to do is to set the maximum area from 40 x 40 to 40 x 80 cm in the program used for engraving and cutting, and the work can begin!
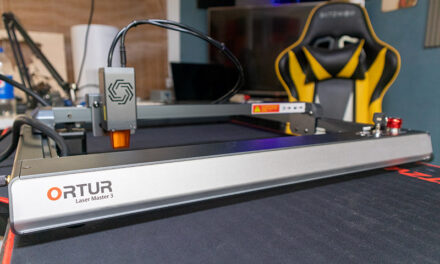
This year I also bought a second machine, namely the newest member of the Laser Master family. I don't want to write too much about the machine here, since I found an article about it as well, and in the article there is a video at the beginning of this article.

The second machine was bought for three reasons. One is that we want to work on several machines at the same time, the other is that it makes it very easy to use the glass rotator, and the third is that the stronger 10-watt laser is already working in it, so there was no need to mess with the rebuild.

Anyway, there is no huge difference between Laser Master 2 Pro and Laser Master 3, so that the head is the same in terms of performance and knowledge. It is quieter, faster, more beautiful and, as I mentioned, using the glass rotator is also easier with the Laser Master 3. Also, we already get a phone application for the Laser Master 3, not a bad one, so we can control it from a tablet or phone.

But, if you're a glass spinner, I'll quickly introduce my last new piece of hardware!
In order for the engraving to be beautiful, the lines to be thin, the focus must be set precisely. For this, of course, the distance between the laser head and the workpiece must be adjusted. This is as long as the plane of the workpiece does not cause a problem, but what is the solution if you want to engrave on a wine bottle, glass or a thermos, for example?

In this case, due to the curvature of the glass, the focus will only be good at one point, so either the lines will become thicker and thicker, or simply nothing will happen, the pattern will not appear on the glass. The glass spinner is a remedy for this problem.
In practice, the glass turner replaces the movement of the cart on the Y axis with rotation. In other words, the laser head can move left and right, but not up and down, in which case the glass turner turns the glass under the head.

With older engravers, you could operate the glass turner by tying off the Y motor cable and connecting it to the glass turner. However, in the case of the Laser Master 3, this is much simpler, because with this machine we get a connector to which we can connect the glass turner, and we get a switch that turns off the Y motor and redirects the current to the glass turner connector.

The glass turner itself is not a complicated structure. There are two rubber rollers on the machine, the distance between them can be adjusted. The glass to be engraved must be placed here, which can then be rotated by a motor via ribbed belts and rubber cylinders.

As an accessory, we get another tool whose height can be adjusted and we find two rubber cylinders on it. This piece is used to support, for example, the neck of a wine bottle or the base of a stemmed glass, so that the bottle will not tip over while working.

I would like to share one more thing, or let's say a trick, with you regarding the glass spinner.
The fact is that in order to be able to insert the rotator under the engraving machine, the machine has to be raised. The manufacturer also offers legs for this, but the price of 4 plastic legs is no less than HUF 30. I replaced them with a simple, height-adjustable plastic furniture leg. For a fraction of the price, I got adjustable height legs instead of fixed ones. Where you can save money!


In this chapter, I really don't want to go into the tricks, the way of real engraving and cutting. If anyone is interested in this topic, you can find the live broadcast (or its recording) at the beginning of the article, in which I also cover these topics. I'll tell you in advance, it won't be a 10-minute clipped video!

What I'm going to address now is to list the tools I bought for work:

My setup looks like this. Of course, it can be simpler than that, you can start with a machine, you don't need the most powerful laser, if you don't want to cut 8 mm plywood, you can buy a lockable box specifically for laser engraving. Ortur also makes it, but it can be good for other manufacturers as well. If you don't want to engrave glass or glass, you don't need a glass cutter.

I will not describe how much this set cost in forints, if you want you can do the math. It's not a small amount, but since it was an investment for us, not just a hobby, I look at it from a completely different perspective.

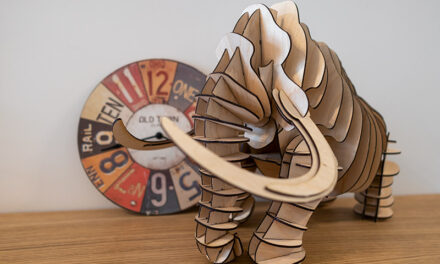
The stated goal at the beginning of the project was to put together a workplace where individually designed, custom-made ornaments, jewelry, etc. can be produced in small series. In the case of a larger quantity, or in the case of series production, we might have been better off with a CO2 laser, although it also has its drawbacks.

In other words, with an affordable CO2 laser, the workpiece cannot be larger than 40 x 40 cm. And the affordable price means that the machine would have cost about as much as in my case the entire set-up, from the two machines, laser, suction, glass turning, everything.

In other words, if you need a stronger laser and you want, say, a 50 x 70 work area, the price of the machine will already be around HUF two million. Unfortunately, this was not a suitable alternative for me, so I stayed with the blue laser and the smaller, but relatively powerful machines and their accessories.


In this article I didn't touch on many things, this topic of laser cutting and engraving would be worth many more articles, and I have a feeling that I will write them sooner or later. Now the goal was to supplement my previous articles and present the end result.

I also said that this set, this package, is a bit much for starters. If you want to get involved, if you want to try yourself, you can start with much less, much less. A reliable machine and a laser head with the power to match your needs. A lockable box, if you want to cut, some exhaust, and you can already work, even in a panel apartment if you live there.

If you are interested in the topic, read my previous articles, watch the videos, and of course look around the internet, because you will find a lot of interesting content!

If I can help, you can ask, you can comment during the videos or in our Facebook group, I will try to answer and find the right components in case of questions or requests, so that you can start your own laser cutting machine as soon as possible!
You can buy the products listed in the article here:
If you prefer to buy from Amazon, click here:


